Uploading Files with WS_FTP
Uploading your web site to a web server is actually quite an easy process. In fact, it is rather similar to copying files between different folders on your local computer. The only real difference is that files are being copied from your computer (the local computer) to a web server (the remote computer). Files are copied from a local computer to a remote computer over the internet using a special protocol known as FTP (File Transfer Protocol). In order to do this, you need to use a software application known as an FTP client. There are lots of FTP clients about but the one we're using here is called WS_FTP LE. The "LE" stands for limited edition and this version of WS_FTP is a cut-down version of it's big brother WS_FTP Pro. However, the LE version is free for personal and academic use. If you wish, you can download WS_FTP LE from the WS_FTP web site.

The WS_FTP client has been around for a while and the free "LE" version is very popular with schools and universities. Many ISPs (internet service providers) also distribute it for use by their users. However, it's clunky interface is now looking a bit dated. There are newer, free FTP clients around such as SmartFTP, that use the familiar "Explorer" style interface. Having said that, functionally, WS_FTP LE does everything that you might want if you just need to upload and maintain a web site on a remote server.
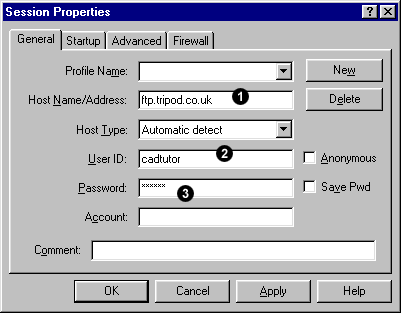
Start WS_FTP LE by double-clicking the program icon, shown on the right.When the application launches, you will see the Session Properties dialogue box. The first thing you need to do is to enter 3 pieces of information in the toolbar at the top of the application window.

- Enter the address for the server you want to contact in the "Host Name/Address" box. For example, if you are uploading files to an account at Tripod UK, the address would be ftp.tripod.co.uk
- Enter your member name in the "User ID" box. This is the name you chose when you set up your account.
- Enter your password in the "Password" box.
Finally, ensure that the Host Type is set to "Automatic detect". Your Session Properties dialogue box should now look something like the one on the right.
You are now ready to connect to your web host. Click the "OK" button.
A Gentle Reminder: Quite obviously it is very important to keep a record of the member name and password you chose when you joined your web host. If you forget your member name and have no record of it, you will not be able to access your files on the web server. If you forget your password but know your member name, you can often reset your password by answering a simple security question. See your web host for details.
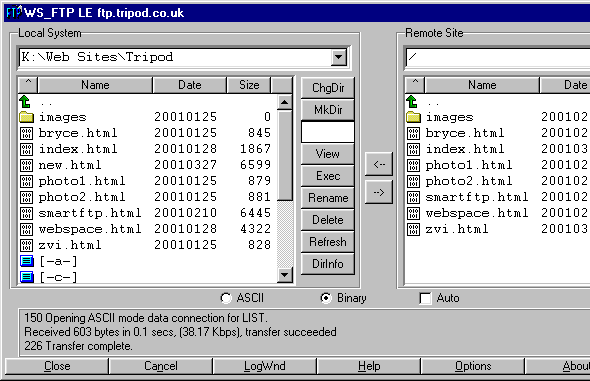
WS_FTP now attempts to contact the web server using the address you gave. Once a connection has been made, WS_FTP passes your member name and your password to the server when it asks for them. If all your details are accepted, a file and folder listing of your own personal web space on the remote computer will be displayed in the Remote Site window. Obviously, the window will be empty if this is the first time you have connected to your web host.

If for some reason you are unable to connect, double check that all your details are correct. Many web servers are case sensitive and so you must enter the member name and password exactly as you entered them when you joined your web host. For example, CADTutor is not the same as cadtutor. If you are sure all your details are correct and you still can't connect, the web server is probably busy or temporarily down. Try again later.
Once you have connected successfully, you will need to navigate your way to the web folder on your local computer or network. You can do this by double-clicking the drive and folder icons displayed in the Local System window. The green arrow icon at the top of the window can be used to move one level up in the folder structure. Once you can see your local files in the Local System window and your remote files in the Remote Site window, you are ready to begin uploading or updating your files.

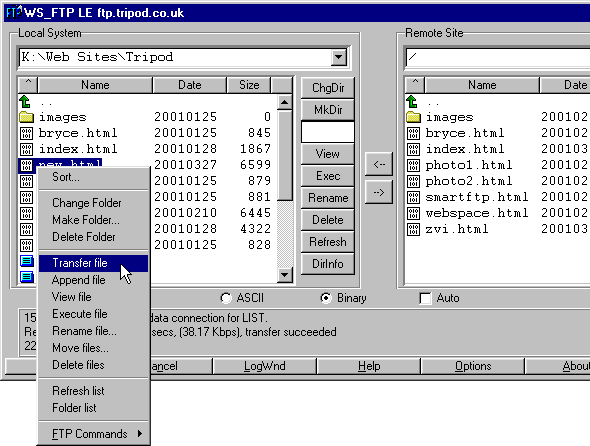
To upload your local files to the web server, simply drag-and-drop them from the Local System window to the Remote Site window just as you would in the Windows Explorer. In fact, many of the standard Explorer operations can be undertaken on your remote files. You can rename them and delete them. Alternatively, you can upload files by highlighting them and then clicking on the right-hand arrow button that appears between the two windows. You can also upload files by right-clicking and choosing "Transfer file" from the menu. Either way, the result is the same. Notice that you can also download files from the remote site to the local system.

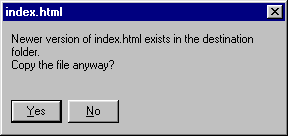
If you are updating files that already exist on the server, just drag-and-drop them in the usual way and they will overwrite the existing ones. Be extra careful when updating files because WS_FTP does not prompt you when files are about to be overwritten. However, you will be prompted if you try to overwrite a newer file with an older one. Unfortunately, this can be very confusing because the clock times of the local and remote systems may not be synchronised. Even worse, if the remote site is in a different time zone, they will be completely different. When a file is uploaded to the remote system, it loses it's local time tag and gets a new one supplied by the remote system. It's possible that a newly updated file on your local system could appear older than the file you are trying to replace. Whenever you try to "update" a newer file with an older one, WS_FTP prompts you with the message shown above. Double-check that you really want to do this and click Yes or No as appropriate.
As soon as your files are on the web server, they are on-line and accessible to the world. Fire up your web browser and check your site to make sure it all works as intended. For example, if your web host is Tripod UK, enter http://members.tripod.co.uk/your_user_name in the browser address window to see your site.
When you are finished organising your remote files, close WS_FTP by clicking the "Exit" button at the bottom of the application window, no special log off procedure is required. You can connect again any time you like to update or add to your web site.
You will find further help for WS_FTP LE at the support area of the FTPplanet.com web site. Further tutorials are also available at the University of Houston, Cal Poly and DIALnet. The DIALnet tutorial has a good description of setting up session profiles.
Donate to CADTutor
If you found this tutorial useful, you might like to consider making a donation. All content on this site is provided free of charge and we hope to keep it that way. However, running a site like CADTutor does cost money and you can help to improve the service and to guarantee its future by donating a small amount. We guess that you probably wouldn't miss $5.00 but it would make all the difference to us.
Local Navigation
Sponsored Links
The Basics
- Dual Dimensions in a Dim…
- UCSICON Options
- "Best of" Basics: Irreg…
- Tool Palette Basics
- Original Dimension Value
- Possible Solutions to th…
- Avoid Using 'Standard' i…
- Shorten the Plot Scales…
- Update the Source File B…
- User Increment Angles fo…
- Drawing Information
- 'Sign Language'
- Rotate with the Copy Opt…
- Use the INSERT Osnap on…
- To or From the Current L…


