
Stage 6: Lighting and Shadows
Introduction
Lighting outdoor scenes involves the setup of a Sunlight or Daylight system, together with ambient light. The sunlight or daylight system gives the main illumination and shadows, with ambient light (light that is 'global' in nature, which affects all objects and is reflected from one to another) provided by using one (or more) of a number of techniques. Techniques for providing ambient light range from environment dialog settings, placement of omni lights, use of a Skylight or a 'light dome' which shines multiple spotlights on the scene and gives soft shadows around objects. This tutorial uses Key 3D Sunlight and Shadows to automatically setup a Sunlight System with some environment settings and including the use of a Key 3D Light Dome for added natural ambient light
NOTE: Lighting setup should be complete, apart from final tweeking, before assigning materials to objects because lighting affects how materials display and render (especially image mapped materials)
6.1 Insert Sunlight System and Light Dome
- Carry on from the previous scene or open ACAD to 3D Stage 6.max
Insert Sunlight System
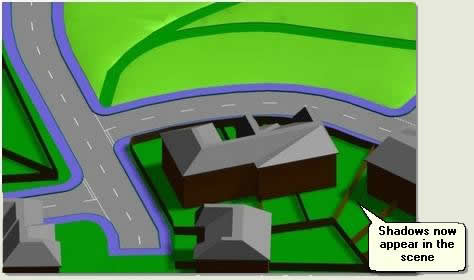
- Open Key 3D Sunlight and Shadows and Press Insert Sunlight. A Sunlight System is inserted in the scene and auto-positioned around the site

- Render the User viewport to see the shadows
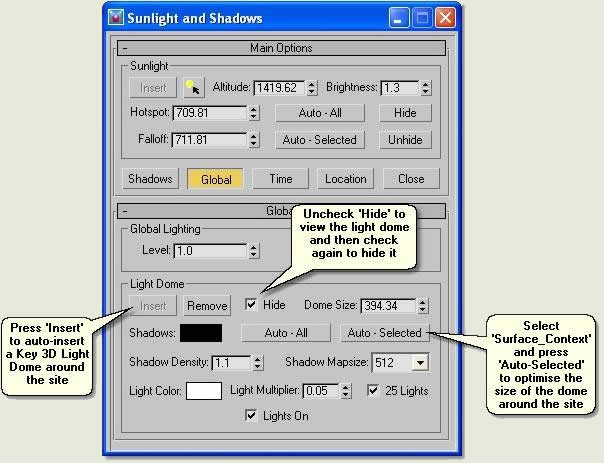
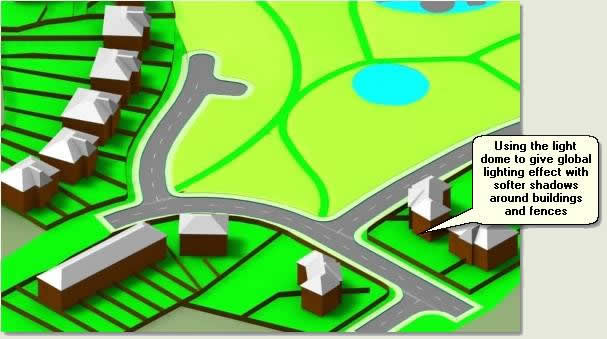
Insert Key 3D Light Dome for Global Light
Use of a light dome is a good alternative to a Skylight or other lights such as omni lights placed in the scene. A light dome arranges multiple spotlights around the site and uses shadow mapping which is far faster than ray-traced shadow solutions. Often referred to as 'fakosity' the effect gives soft shadows around and under objects and simulates natural exterior lighting
- Key 3D Sunlight and Shadows > Global dropdown dialog
- Press Insert. This automatically inserts a light dome around the site. To optimise the size of the dome select Surface Context and press Auto-Selected
- To view the light dome uncheck Hide, then check again to hide the light dome
NOTE: The Key 3D Template scene has the Ambient Color changed from black to mid grey on the Environment dialog. Check this colour at this stage and alter if needed to lighten or darken the overall lighting in the scene. However, do not lighten to much as this can have the effect of reducing contrast and 'flattening' the scene
6.2 Alter settings for light and shadows
Experiment with the following settings to create the optimum lighting effects for the scene. These settings can be re-visited when materials have been applied to further enhance the output renders
General Sunlight settings
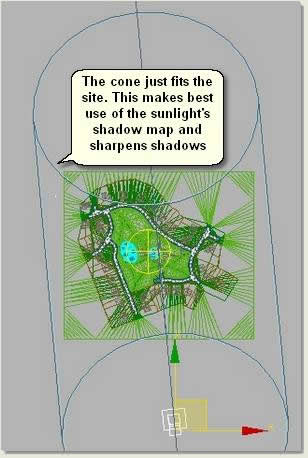
- Reduce the Hotspot and Falloff so that the sunlight just covers the site: Select Sunlight_Key3D and reduce the Falloff or increase the Hotspot whilst looking at the sunlight cone in the Top viewport. This optimises the shadow map settings giving the ability to emulate ray-tracing shadows if needed
- Change the Brightness value if required
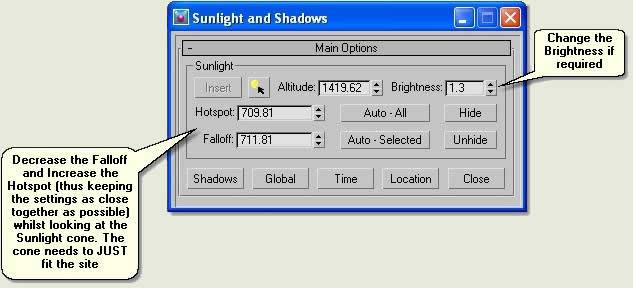
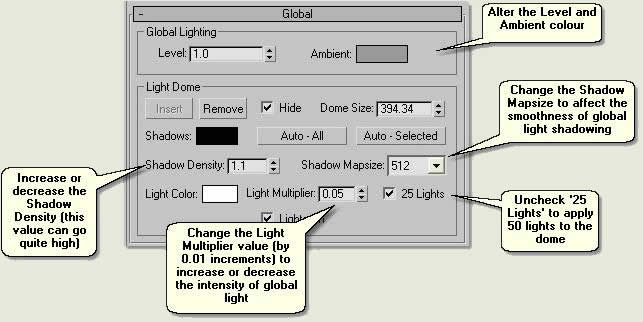
Global Light Settings
- Alter the Level and Ambient colour
- Change the Light Multiplier value (by 0.01 increments) to increase or decrease the intensity of global light
- Increase or decrease the Shadow Density value. Note that this value can go quite high (up to 3 or 4)
- Change the Shadow Mapsize to affect the smoothness of global light shadowing
- Uncheck '25 Lights' to apply 50 lights to the dome
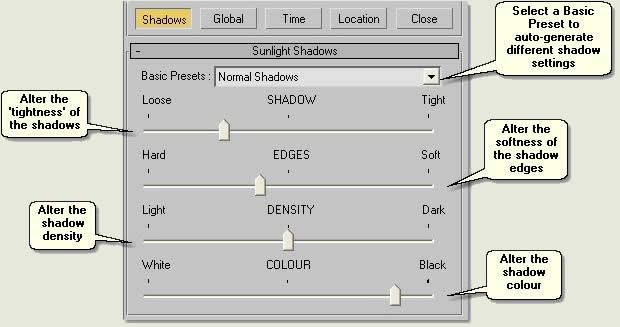
Shadow settings
- Press Shadows to open the Shadows dropdown dialog
- Select a Basic Preset, either Normal, Strong or Soft to auto-generate the required type or fine tune as follows:
- Under SHADOW alter the tightness of the shadows
- Under EDGES alter the softness of the shadow edges
- Under DENSITY alter the shadow density
- Under COLOUR alter the shadow colour from white to black
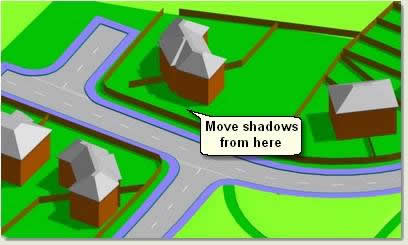
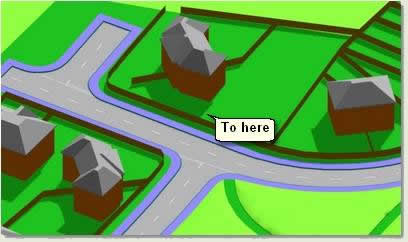
6.3 Animate the Sunlight
Animating the sunlight throughout the day is a quick way to achieve the required shadows based on the time of day
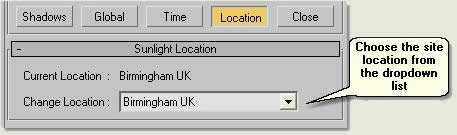
- Press Location
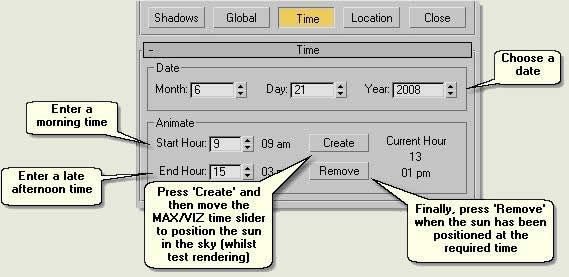
- Press Time
- Choose a date, a start time and an end time and press Create
- Move the Time Slider to position the Sunlight in the sky and test render to find the best solution for the scene. The Current Hour is updated as the Time Slider is moved
- When the Sunlight is in the optimum position press Remove to remove the animation
NOTE: A common mistake is to leave animation on the Sunlight when animating objects such as cameras. This will animate the sun as the camera moves. So, unless a shadow study animation is being made, always remove the animation when the optimum sun position has been achieved and use the animation tools mainly as a quick method of positioning the Sun
- Finally, on the Display Panel Hide by Category the Lights. This will help when zooming to the site as the Sunlight will not be included

Donate to CADTutor
If you found this tutorial useful, you might like to consider making a donation. All content on this site is provided free of charge and we hope to keep it that way. However, running a site like CADTutor does cost money and you can help to improve the service and to guarantee its future by donating a small amount. We guess that you probably wouldn't miss $5.00 but it would make all the difference to us.
Local Navigation
Sponsored Links

The Basics
- Dual Dimensions in a Dim…
- UCSICON Options
- "Best of" Basics: Irreg…
- Tool Palette Basics
- Original Dimension Value
- Possible Solutions to th…
- Avoid Using 'Standard' i…
- Shorten the Plot Scales…
- Update the Source File B…
- User Increment Angles fo…
- Drawing Information
- 'Sign Language'
- Rotate with the Copy Opt…
- Use the INSERT Osnap on…
- To or From the Current L…


